Adding a few ‘Windows’ features to MacOS

I’m something of an Apple laptop advocate.

I’m not, however, hugely into the Apple eco-system; I don’t own, and have never owned, an iPhone, iPod, iMac, iWatch, or some of the other things. I do, however, own an old iPad with a cracked screen that was particularly cheap, and I got a free AppleTV a short while back. I’m a pragmatist deep down, so I tend to favour the best tool for the job, rather than fashion and so on.

A few years ago I moved to a MacBook Pro for development and never looked back. I recently had to switch back to Windows briefly, due to my older work MBP failing over the Christmas period, and quickly became frustrated at how protracted certain things were that are just simpler to accomplish on a Mac.

This works both ways, though. As a pragmatist, I can’t help but miss certain ‘things’ on Windows that are, perhaps, missing or simply different on a Mac for various reasons.

Luckily, AppleScripts and Automator make it possible to ‘add’ that functionality back in.

Sharing File Paths

In the development world, most things are normally going to exist on, or be deployed to, a *NIX type system. It’s one of the thing I like about MacOS – you have the advantages of a Linux type system, without the compatibility issues of being purely on Linux. It does, evidently, become an issue when you have Windows users (Muggles, if you like) in your work eco-system. Sharing a file path will, in native OS terms, mean that your slashes are the wrong way round.

It’s easy in windows to just user the address bar to get a file path, like so.

https://media.askvg.com/articles/images/Windows_Explorer_Addressbar_History.png

You can, of course, enable the ‘Path Bar’, which allows you to context click on a directory to get the Pathname, but it doesn’t work as easily with files (especially if I want to reference a configuration file in a script quickly), so this solution suits both usages.

Adding a ‘Copy File Path’ context menu option

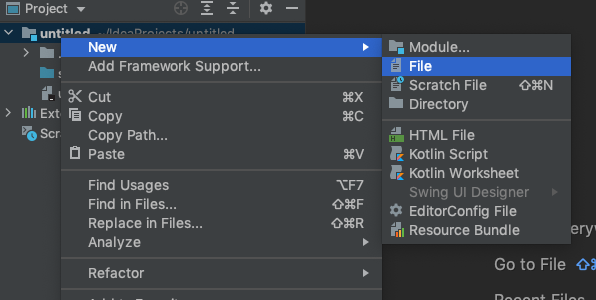
To start off, we need to open ‘Automator’.

Within Automator, select ‘Quick Action’

Screenshot 2020-01-21 at 11.07.19.png

Next, set the Workflow to receive ‘files or folders’ in Finder.app

Screenshot 2020-01-21 at 11.09.35.png

Then select ‘Copy to Clipboard’ as the action by dragging it into the workspace area.

Screenshot 2020-01-21 at 11.09.53.png

You should now be able to Save this as a Quick Action. The name you choose here will reflect how it is displayed in the context menu, so choose something based on that outcome.

Screenshot 2020-01-21 at 11.11.43.png

Adding a ‘Copy File Path’ context menu option with Windows-style slashes

Following the above steps, you can now select ‘Duplicate’ to make the next action:

Screenshot 2020-01-21 at 11.16.40.png

This will keep everything including the ‘Copy to Clipboard’ step. We’re going to add a ‘Run AppleScript’ action that comes after that.

In the AppleScript editor window that appears, paste in the following:

on fixpath(macpath, search, replace)
    set OldDelims to AppleScript's text item delimiters
    set AppleScript's text item delimiters to search
    set newText to text items of macpath
    set AppleScript's text item delimiters to replace
    set newText to newText as text
    set AppleScript's text item delimiters to OldDelims
    return newText
end fixpath
 
get the clipboard
set macpath to the clipboard
set macpath to fixpath(macpath, "<", "")
set macpath to fixpath(macpath, ">.", "")
set macpath to fixpath(macpath, ">", "")
set macpath to fixpath(macpath, "smb://", "\\\\")
set macslash to "/"
set winslash to "\\"
set winpath to fixpath(macpath, macslash, winslash)
set the clipboard to winpath

You can add other ‘set macpath’ clauses for replacing specific drive/folder references if you wish.

You can now save this variation as a different Quick Action, e.g.

Screenshot 2020-01-21 at 11.41.00.png

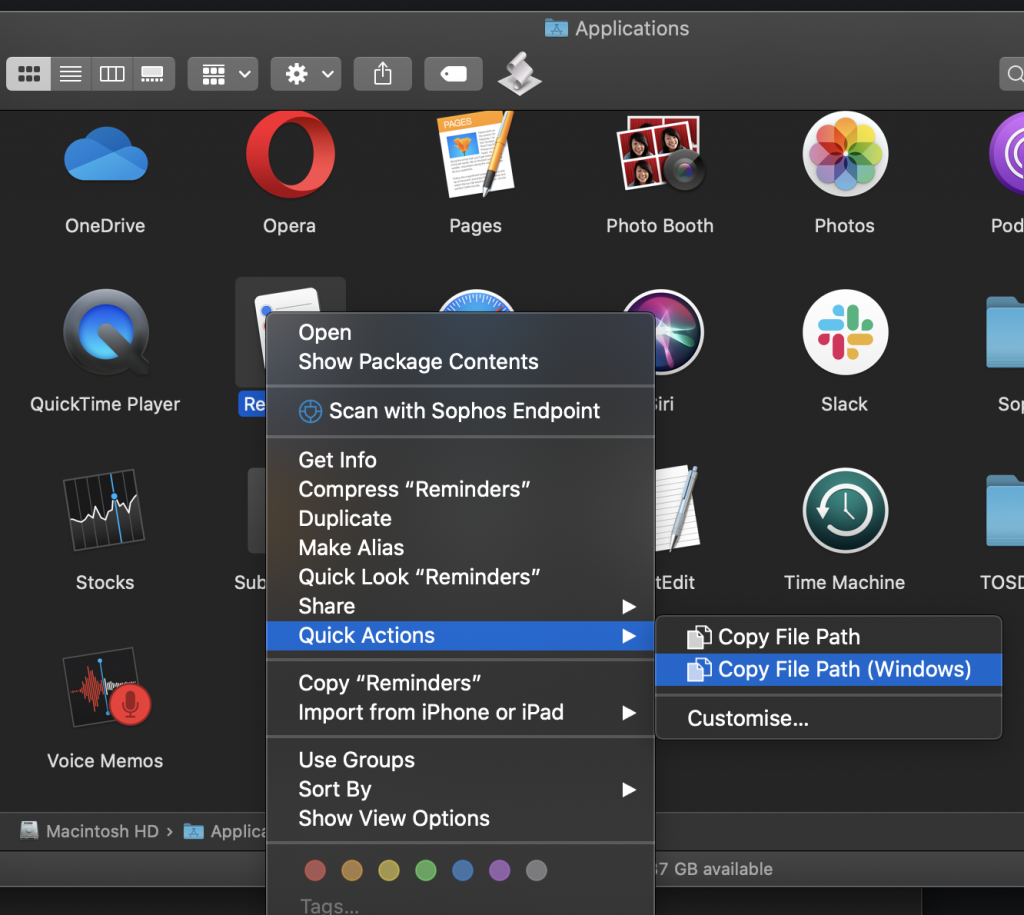
You should now be able to see your options in the context menu, under ‘Quick Actions’ when selecting a file:

The result of the above being:

Refreshing the Finder Window

Another annoyance is when something other than Finder changes/amends the directory structure – Finder doesn’t ‘update’ to know about it. This happens a lot with development and can make things frustrating.

Unfortunately, there isn’t a default Finder ‘refresh’ button like you get in Windows, but you can add one.

To do this, open Script Editor:

Then, paste the following snippet into the editor.

tell application "Finder" to tell front window to update every item

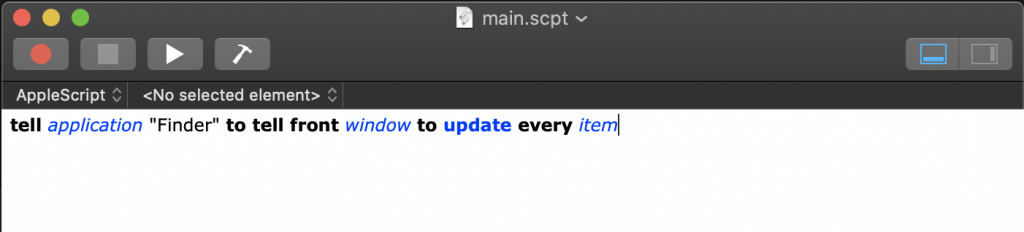
Now, choose File > Export, then select ‘Application’ as the File Format:

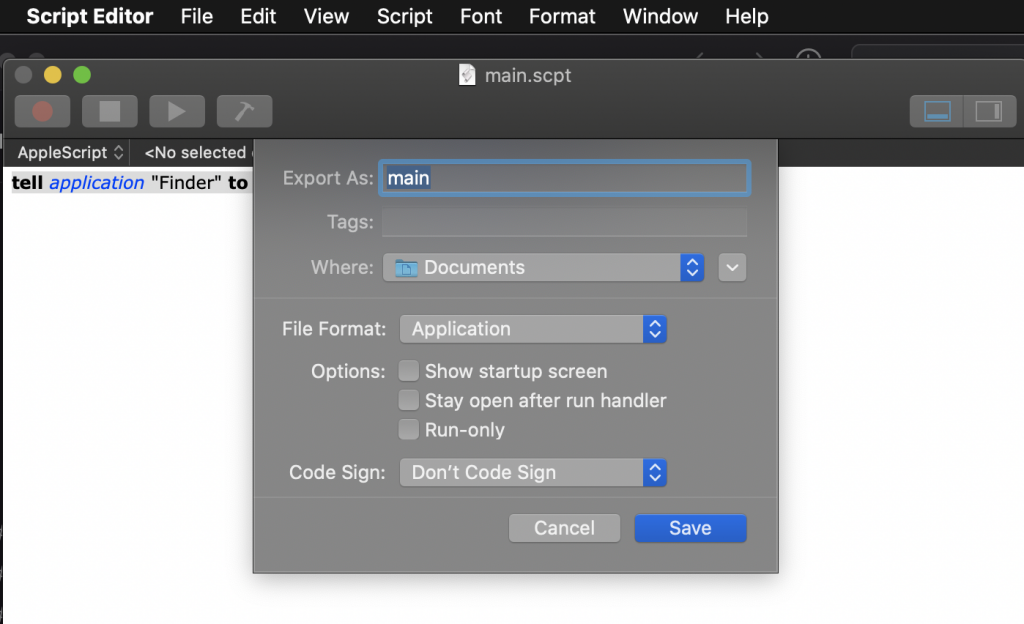
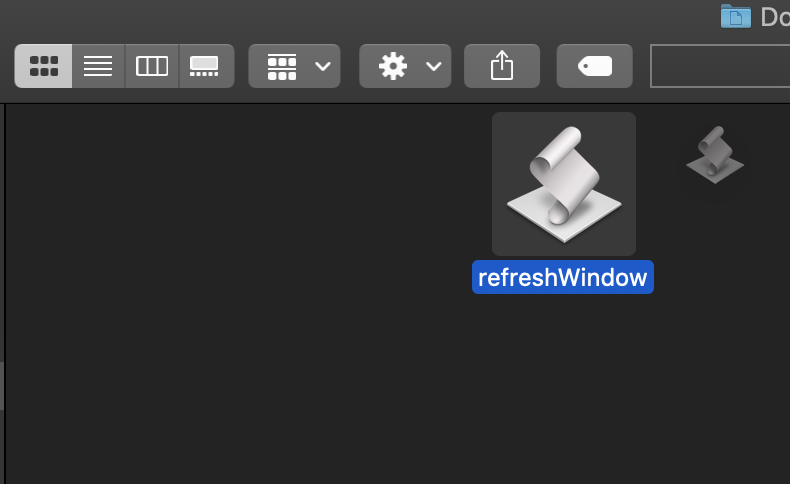
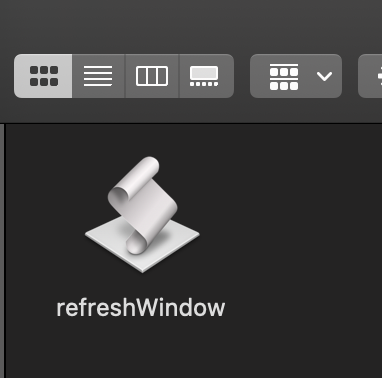
You should then have an Application file in the target folder.

If you hold the Command button, you can now drag this to the toolbar.

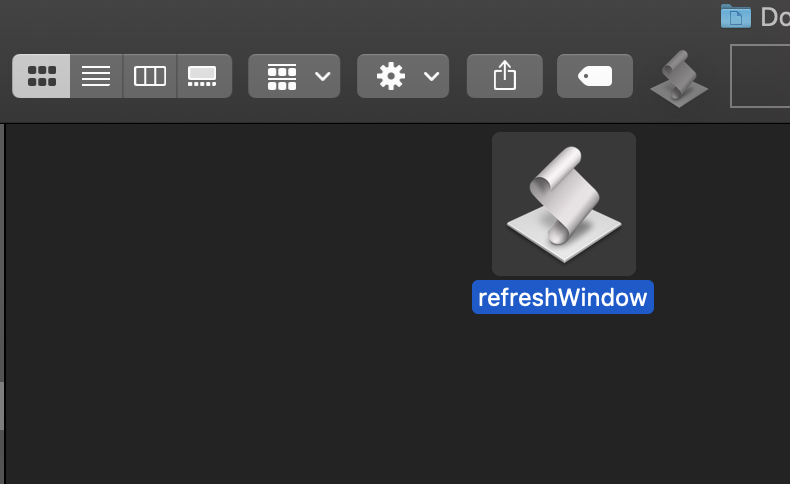
You can now use that button to refresh Finder, and update the directories for any changes that have occurred that Finder isn’t aware of.

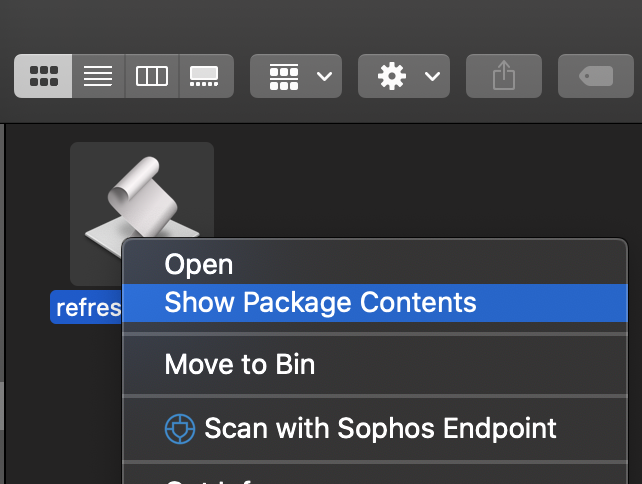
You can, if you wish, open the package and change the icon. This can be used to make a ‘prettier’ button.

You can move the button at any time by holding command and dragging it back off the toolbar – useful if you want to experiment with the icon.

Protecting Branches in GitHub

Version Control is an essential tool in development. It allows changes to be made ‘safely’, without fear of irreversibly changing code.

It isn’t without its risks, though.

Accidents can happen. But how do you also prevent obvious mistakes from being made, avoiding any time-consuming damage control on important branches? GitHub has some built-in tools to help automate these processes.

Where are these fabled settings? In Settings, of course!

There’s a category in the Settings tab of any repository called ‘Branches’. This is what it’ll look like by default:

You can just about see the section we’re interested in – ‘Branch protection rules’.

In this instance, we’re going to click ‘Add rule’.

Configuring Branch Protection

You’ll see the first option is to specify a ‘Branch name pattern’. Pattern, you say? I’ll use Regex then!

No, unfortunately not. Github apparently uses fnmatch for pattern matching, so you’ll want to work off that.

In this example, we’ll use an explicit ‘master’ reference.

These are our protection options, at time of writing:

There’s a lot that can be configured here, depending on how your personal or work environment is configured. ‘Require pull request reviews before merging’ is the key one here though.

As per the above, you can enforce that a PR cannot be merged until a number of approving reviews have been submitted – that is, one user (other than the author) must approve the PR before it can be merged. In teams of at least 4 people, it’s a good idea to have this set to 2 people, minimum.

What if there aren’t 2 other people available? Well, that’s a business decision. It could be argued that mistakes occur under pressure, so this might be the vital part you need to think about.

In addition, it’s a good idea to have approvals ‘dismissed’ if new commits are pushed. If left unticked, an approval could be out-of-date, which would make it a little redundant.

Finally, ‘Require review from Code Owners’ means that at least one review is required from a ‘Code Owner’ – this is another useful feature that I will cover in another post.

‘Require Status Checks’ is useful if you have Jenkins integration in your repositories – you can prevent changes being committed that would break your builds. Going further, SonarQube is a powerful ally in your Pull Requests, adding in the ability to check for Technical Debt or Code Coverage before a PR is able to be merged.

In this example, I’m only going to select these others:

‘Include administrators’ can be problematic on your master branch (or other release branches) if you use Jenkins for releases, so tread with caution. It should be fine for non-release branches.

Let’s see it in action.

Protected Branches in Action

I’ve made a simple change here to the develop branch, and I’ll open the PR to the Master branch.

(Note in the ‘Reviewers’ section it already says “at least 1 approving review is required”)

Once opened, the Pull Request will be blocked from merging until one review has been added.

Now that we’ve seen what we can do, let’s weigh it up.

The Advantages

The default stance on this is that, quite clearly, it is a powerful configuration tool to have available. It will give visibility to your repositories and can not only prevent people pushing directly to Master. Let’s look at the detail of that option again:

When enabled, all commits must be made to a non-protected branch and submitted via a pull request with the required number of approving reviews and no changes requested before it can be merged into a branch that matches this rule.

As all commits must come from a non-protected branch and via a pull request, it means that it helps to enforce good behaviours, such as feature branches.

Integrating some of the additional options, such as ‘Require Status Checks’ is also, where possible, a great way of automating quality. People tend to push back against individuals requesting a certain quality level, or a certain amount of Unit Test coverage – but there’s no reasoning with an automated gate. This means that you can be less vigilant and let GitHub look after your branches.

The Disadvantages

I’m a big fan of Branch Protection, but it can be a bit of a pain when you get to more intricate configurations. If, for example, you rely on SonarQube as a way to police code quality with a ‘Required Status Check’, if SonarQube is having a bad day, it can block your progress.

Equally, if an important fix or release is needed, and it’s at a time when people tend to not be around as much (e.g. Christmas), then you can also be obstructed by simply not having enough reviewers to meet your requirements.

These are, of course, business process gaps at best. As mentioned earlier, would you want code to be merged if SonarQube isn’t working? Or if there aren’t enough developers to review the code? This is perhaps where you can restrict who has administration access, and ensure a repo admin is always available in extreme cases.

The decision is, of course, only yours to make.

Running a Docker Image in IntelliJ

Carrying on from the last post, Running Glassfish 3 with Docker, this post will continue to making use of the Docker Image.

I’m a fully paid-up IntelliJ user, and so I use IntelliJ Ultimate Edition for development work. This isn’t vastly expensive, being around the £15 to £20 a month area (a very small percentage of your earnings as a professional), but you can actually do this via the free Community Edition, so I’ll demonstrate using that.

You can download IntelliJ from the JetBrains website.

Setting up Docker in IntelliJ Community Edition

It won’t already be set up, or at least it wasn’t when making this guide, so you will need to Install the Docker plugin first.

This can be done via Preferences > Plugins, then search for ‘Docker’ in the Marketplace tab:

Once Docker has installed, the Docker pane should open at the bottom of the Workspace. Right click the Docker instance and select ‘Connect’:

You should now see the images you used in the previous step; the ‘myimage’ (or whatever you named it) and the ‘openjdk’ image we used to make that one.

Starting a Container with Exposed Ports

Starting where we actually left off, we need to expose the ports for Glassfish on our container.

Right click your image and select ‘Create Container’:

In the window that opens, click the folder on the ‘Bind Ports’ input and set the ports you want to bind. For a default, unfettled, Glassfish domain, this is likely to be 4848 for the Admin port, and 8080 for the Web port:

Once you’ve set the ports, click ‘Run’. This should start a container. The build log should successfully deploy the container:

In the ‘Attached Console’ you should see the tailed log for the server. As can be seen, this has started successfully with an admin port of 4848.

This means we should now be able to access the admin console of the Glassfish instance of the container by visiting localhost:4848.

We now have a different conundrum; Secure Amin isn’t enabled, so we can’t log in. We could access the console for the container and enable it, but it’ll reset each time. Not ideal.

Solving the Secure Admin issue

There’s a few ways around this:

  • You can ignore it (perhaps your deployed item doesn’t need a connection pool or any other reason to log in to the Admin console?)
  • You can create the original image with a pre-configured domain copied over (remember that COPY bit in the previous post’s Dockerfile?)
  • Or, you can copy over the domain’s config folder each time in a Dockerfile

The last option is quite useful, as it means you can also have a more fluid deployment option, but for now we’ll look at the second option and make a better image.

Configuring the Domain

If you haven’t already got a domain.xml file all set up with secure admin enabled (let’s pretend this is your only way to get Glassfish running) then you will need to use the original image to get started.

With a container for that image running, we can use the CLI and change this in Glassfish’s ‘asadmin’.

Starting the domain with the command line

As per our Dockerfile, the Glassfish bin directory should be available on the path, meaning we can simply use the command asadmin from anywhere on the command line inside the container. We need to start our domain before asadmin can modify it, so we’ll do that now.

Once asadmin is running, enter the command (amending the domain name to suit):

start-domain domain1

All being well, the domain should now start.

Admin Keyfile

The Admin Keyfile stores the admin password for logging into Glassfish. You can’t enable secure admin if you don’t have a password, and one isn’t available in domain1 by default.

The command to do this is (amending the domain name to suit):

change-admin-password --domain_name domain1

You should be able to see that only the Admin Keyfile has changed:

We can now look to enable secure admin

Enabling Secure Admin

With our domain now running, we can use the following command, (amending the admin port if you’re using something different):

enable-secure-admin --port 4848

(If you get an error saying the domain isn’t running, start it using the previous step)

Now, as per the instructions, we will restart the domain.

restart-domain domain1

Persisting the config changes

We can copy these changes out to our computer by using the docker cp command, as demonstrated below on a Windows environment. This command will copy the domain’s config directory to our Windows Desktop:

This may take a short while to run, but once it’s done you should see something like this:

Option 1: Amending the Dockerfile to create a new Image

We can now copy the config file to our original Dockerfile folder and use it to create a new image (avoiding the need to do this each time).

This can be done by adding in a step to copy over our new config directory onto the default domain1 domain.

FROM openjdk:7-alpine 
# Install a few basic bits 
RUN apk update && \
    apk add wget nano unzip bash pwgen expect
RUN wget http://download.oracle.com/glassfish/3.1.2.2/release/glassfish-3.1.2.2.zip && \
    unzip glassfish-3.1.2.2.zip -d /opt && \
    rm glassfish-3.1.2.2.zip && \
    rm -rf /var/lib/apt/lists/* && \
    rm -rf /opt/glassfish3/glassfish/domains/*
ENV PATH /opt/glassfish3/bin:$PATH
# Copy over our domains and any external libraries we need
COPY config /opt/glassfish3/glassfish/domains/
domain1/config/
COPY ojdbc /usr/lib/jvm/java-1.7-openjdk/jre/lib/ext/
COPY glassfish.sh /opt/glassfish3/glassfish.sh
WORKDIR /opt/glassfish3/
LABEL maintainer="chris@cjack.uk
# Copy our entrypoint script over 
ENTRYPOINT ["sh", "glassfish.sh"]

We’ll now just need to build the image again, as per the previous blog post.

docker build . -t myimage

Then, once the image has build, spin it up with the port bindings:

You will have a good idea if this has worked, because secure admin will only work on https. This will manifest itself as an ‘invalid certificate’ warning in the browser (shown here in Opera).

Once you proceed, the admin console will take a short while to install. You should soon see the login prompt – without the secure admin error…

You should now be able to log in with the admin username and password you set earlier in the steps.

Option 2: Using a Dockerfile with your new config

Alternatively, you can carry on with the old image and just copy across the config for a new container. It’ll still depend on the parent image, so it’s not as clean, but it is easy to do in IntelliJ.

To do this, we’ll create a new File in the root of our project.

In this file, you can create something like the following, in a file named ‘Dockerfile’:

FROM myimage:latest
COPY config /opt/glassfish3/glassfish/domains/domain1/config/

Remember to replace myimage:latest with the name of your image.

Next, right click the Dockerfile and select ‘Modify Run Configuration’

Set the Port Bindings as per the earlier steps – notice that there’s now a value in the Dockerfile input box.

We’ll now stop any running containers

And we’ll start our a new container using our Dockerfile Run Configuration

Automatically Deploying an EAR

You can now go about setting up your container to start with a deployment automatically. You can do this by adding the following to your Dockerfile, if you’ve use the previous step. If not, follow the previous step and skip the config copy, substituting it for the below instead.

COPY MyModule/target/MyApplication*.ear /opt/glassfish3/glassfish/domains/domain1/autodeploy

Replace the first part of the COPY argument to the path of your item that you want to deploy. Also amend the target domain name in the autodeploy directory, if you’re not use the default domain1.

In this example, we’re assuming I have a module named MyModule that builds an application named MyApplication-0.0.1.ear, or similar, where the version number is appended (we want this to be somewhat dynamic).

The idea is that we would, for example, run a Maven package command to build an ear, then use the target output in our container. This Dockerfile will copy the EAR into the domain’s autodeploy directory before the domain is started.

You should now be able to run a Container using this run configuration, and each time the latest build of the EAR should deploy when Glassfish starts in the container.

Running Glassfish 3 with Docker

Glassfish 3 is getting on a bit now.  The final version of that generation, 3.1.2.2, was released in July 2012 – at the time of writing, that was some 8 and a half years ago.

Glassfish 3 won’t run on Java 8, and so one solution, up until now, would be to have a JDK specifically for Glassfish (and maybe other legacy Java instances).  That has previously been my chosen strategy, but IDE integration is also a key part of the requirement – being able to easily deploy to and debug an application is often a daily activity.

This is fine, and can be done quite easily, but I some time ago ran into an issue now that Java 8 is also getting a bit leggy – IntelliJ, my IDE of choice, started to want to run on Java 11.

Attempting to use a Glassfish 3 Application Server would give the following warning:

“GlassFish Server before 4.x do not support Java 9 and later versions. Either use Glassfish Server 4.x or restart IntelliJ IDEA on JRE 8”

That’s also been fine in the past – IntelliJ has a ‘Choose Runtime’ plugin that allows Java 8 to be the SDK that IntelliJ would run on.

Things have changed, as of somewhere around version 2020.3, and IntelliJ will now no longer run on JRE 8.  As a result, Glassfish 3 in IntelliJ is official dead.  Sort of.  You can still bodge Glassfish 3 to run, but it won’t deploy.  And it won’t know it’s started successfully.  Not at all fit for purpose.

In addition to all this, it’s not uncommon (in my experience) to find colleagues spending a lot of sprint time simply trying to get Glassfish to run correctly, or to get an application to deploy correctly.  It’s simply not a polished version of the Application Server, and Stack Overflow is littered with tales of woe whose solution is “It’s fixed in GF4+”.  But what if upgrading isn’t an option?

One answer, of course, leads us onto the topic of this post.  Docker.

Docker

I won’t go into too much detail around what Docker is – there’s plenty of that out there.  In simple terms, it’s a way of running virtualised Linux environments in a fixed state.  A bit like Virtual Machine, but with a lot more flexibility.

The key advantage is this approach is that it should eliminate all instances of “It works on my machine”.  As well as that, it allows Glassfish to be started and run from a fixed origin point; avoiding any changes to the application or configuration that might occur in the process of using it, and allowing the ‘environment’ to be destroyed and re-created from the known working start point.

The Dockerfile

So what do we need?  Well, first of all we’ll need a Dockerfile.

A Dockerfile is a series of instructions that tell Docker how to create the initial ‘image’ of the environment.  For the starting point (FROM) I’m using an OpenJDK Docker image.  These can be found on https://hub.docker.com/_/openjdk in different flavours.  OpenJDK 7 Alpine suits what I needed, but you can of course tweak it to a different release if you need to.

Watch out if you make a Dockerfile on Windows. The linefeed/returns are different and won’t run correctly on Linux. This will manifest itself as some strange and unsuccessful build behaviour.

Anyway, the Dockerfile we’ll use is this:

FROM openjdk:7-alpine 
# Install a few basic bits 
RUN apk update && \
    apk add wget nano unzip bash pwgen expect
RUN wget http://download.oracle.com/glassfish/3.1.2.2/release/glassfish-3.1.2.2.zip && \
    unzip glassfish-3.1.2.2.zip -d /opt && \
    rm glassfish-3.1.2.2.zip && \
    rm -rf /var/lib/apt/lists/* && \
    rm -rf /opt/glassfish3/glassfish/domains/*
ENV PATH /opt/glassfish3/bin:$PATH
# Copy over our domains and any external libraries we need
COPY domains /opt/glassfish3/glassfish/domains/
COPY ojdbc /usr/lib/jvm/java-1.7-openjdk/jre/lib/ext/
COPY glassfish.sh /opt/glassfish3/glassfish.sh
WORKDIR /opt/glassfish3/
LABEL maintainer="chris@cjack.uk
# Copy our entrypoint script over 
ENTRYPOINT ["sh", "glassfish.sh"]

As per the comments in the Dockerfile above, the image will first get the OpenJDK 7 build, install Wget, Nano, Unzip, Bash, Pwgen, and Expect packages, then it’ll use Wget to download the Glassfish 3.1.2.2 release.  Part of this step deletes the default ‘domain1’ domain (see below).

This will be installed in /opt/glassfish3 on the docker image, and the bin directory will get added to the Path.

Next, we copy some files from the Dockerfile directory onto our image.  This involves:

  • Copying over a base ‘domain’ to use (this is optional.  You can comment/remove the aforementioned deletion of the default domain and use that, if you prefer. )
  • Copying any external libraries that Glassfish may need (for example, database drivers)
  • Copying the Entrypoint script that will start Glassfish when the container is loaded.

As a result, you will have a folder layout like this:

The Entrypoint script, glassfish.sh, is quite simple and looks like this:

#!/bin/sh

/opt/glassfish3/bin/asadmin start-domain $1

tail -f /opt/glassfish3/glassfish/domains/$1/logs/server.log

(The $1 allows a domain name to be passed as an argument. You can substitute this for a fixed domain if you don’t need to use this as the basis for a few different domains)

The domain is started and then the log is tailed immediately after this.

Building the Image

Next we will use the Dockerfile to build the image. At this point I’ll assume you have Docker correctly installed and on the Path of your OS.

From within the same directory as the Dockerfile, type:

docker build . -t myimage

The . is for the path to the Dockerfile. It’s in the same folder as we’ll be running the command, and is the only one in there, so it’s just a quicker way to do it.

-t allows an image name to be specified (in this case, ‘myimage’). This will be useful for if you want to integrate this into an IDE a bit ‘slicker’.

When you run the command, Docker should start to build the image:

When this has complete, you should see something like the following:

Running the Docker Image

This is the easiest bit. You should now be able to start the image by running:

docker run myimage
Running the Docker image should start the domain then step into tailing the domain’s log file

Of course you’ll want to swap myimage for the name of your image, and add a domain name to the end if you opted to retain the $1 argument placeholders in the Entrypoint script.

We haven’t configured enough to use Glassfish yet – it is currently running on Ports in the container that we can’t access yet. That will come next.